Project 01 — Engineering Design

Robot Arm
End-Effector

Oct 6 – Dec 5, 2025

Project Manager & Designer

CAD · Python · 3D Printing · Project Management

01

Project Overview

The purpose of this project was to design a universal end-effector that can be used to grab, lift, and subsequently move objects of varying shape and dimensions to a different location. The end-effector was mounted to a Q-Arm and paired with a complete Python codebase for automated item purchase and retrieval.

Oct 6, 2025
Dec 5, 2025

Added Constraints

  • Operate quickly and without wasted movements
  • Maximize operating speed
  • Total effector mass could not exceed 100 g
  • Minimize amount of material and fasteners used
  • Be able to pick up and transport all 6 items across the difficulty scale

Code Base Features

  • Allow user to create and authenticate credentials, securely stored as encrypted hash values
  • When a barcode is scanned, the program determines associated items and sends movement commands to the Q-Arm
  • Once the user finishes ordering, the program returns a full order summary
Real World Application

Create a universal solution for use in an e-commerce warehouse — retrieving items from shelving and moving them onto a conveyor belt for shipping.
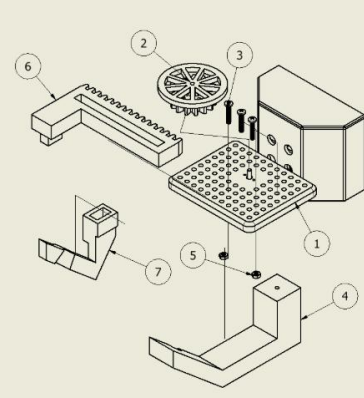
Exploded view of all end-effector parts
Figure 5 — Exploded view of all parts used
3D

Interactive Model

⬇

Model unavailable

The end-effector model couldn't be loaded automatically. You can browse for the .stp or .stl file manually below.

.STEP · .STL
Loading model…
Drag to orbit · Scroll to zoom · Right-click drag to pan
02

Personal Contributions

I was the project manager for this project and oversaw the progress and completion of tasks and deliverables, while ensuring participation from all group members.

A tactic I found invaluable was to designate each team member as the lead for a specific task — the CAD model, or programming the Q-Arm. I took responsibility for integrating the different elements together and ensuring all members understood the current timeline.

Project Management Skills Developed

  • Creating a GANTT chart
  • Planning and facilitating meetings
  • Resolving conflict between team members
  • Delegating work to group members
  • Ensuring tasks were completed on time

Python Programming

The program for the Q-Arm began with creating flow charts for all individual tasks and the main menu. I personally created the flow chart for the authenticate function, which verifies user credentials against a file of encrypted entries.

I Learned

  • Programming functions in Python
  • Using the Bcrypt module to encrypt data as a hash value
  • Creating flow charts for functions and programs
03

Design Process

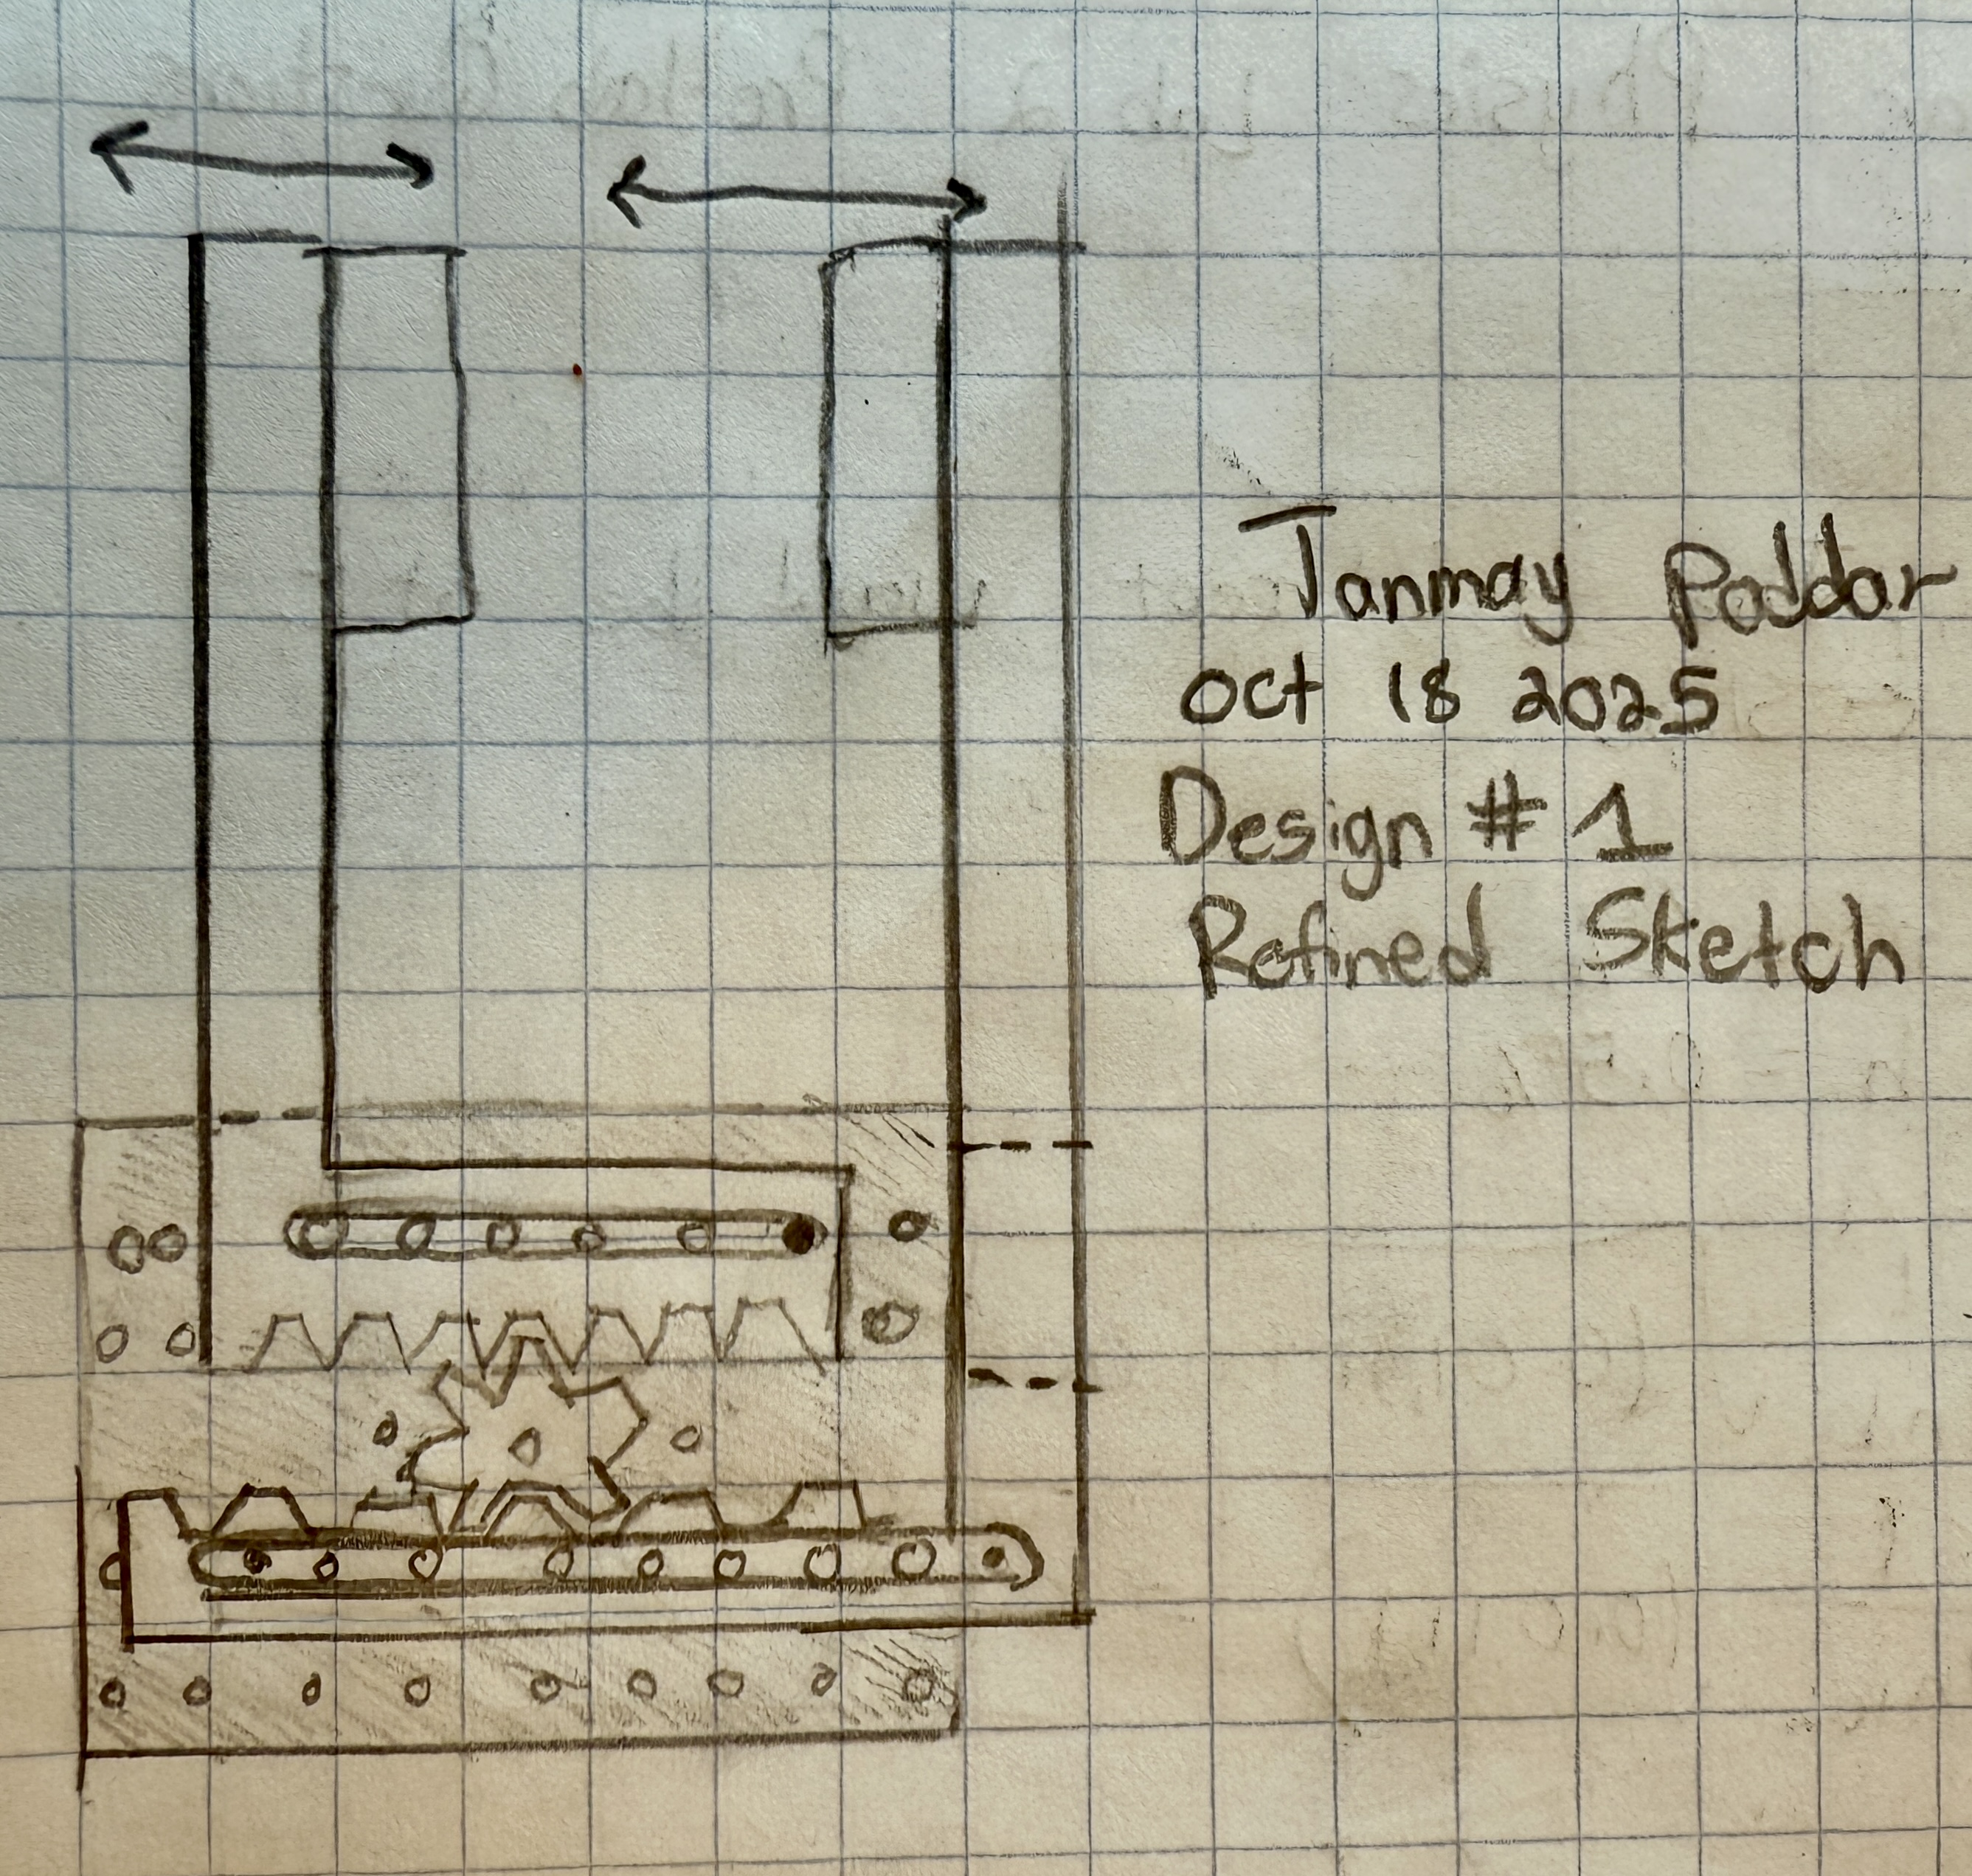
The design process began with each member creating a concept sketch and CAD model. My design — using 2 arms linked by a rack and pinion — was selected to proceed with.

A principle I implemented from the beginning was to reduce the number of moving parts. As a team we iterated on the initial design with two major modifications: fixing one arm permanently, and hanging both arms downward at an angle. The angle was calculated using trigonometry to be approximately 45 degrees.

I designated a member to be the CAD lead who drove development of the 3D model from the approved design.

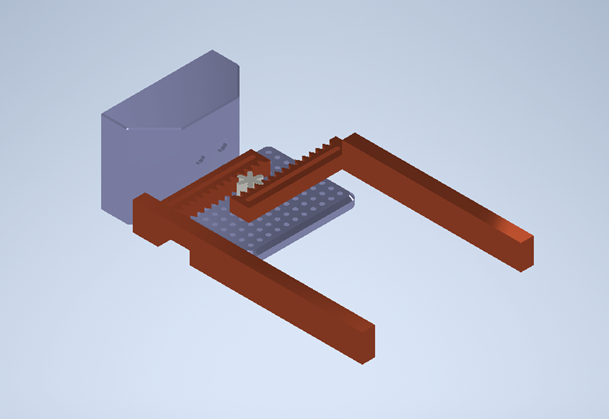
Refined sketch design from top view with 2 moving arms
Figure 1 — Refined sketch, top view, dual-moving-arm concept (Oct 18, 2025)
CAD design for end effector with 2 moving arms
Figure 2 — Initial CAD model with 2 moving arms
04

CAD Model & Iterations

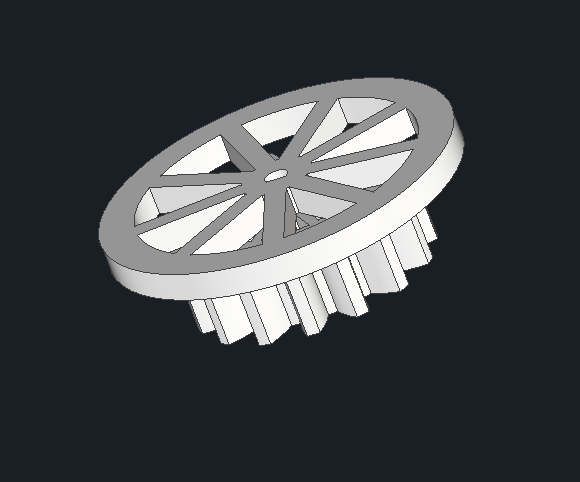
With the initial prototype, we found that the claw would pivot against the edge of the mounting plate and slip off the gear due to the torque of grabbed objects. We redesigned the gear with a cap on top to maintain contact between the rack and the pinion.

This modification highlighted the importance of restricting the degrees of freedom for parts.

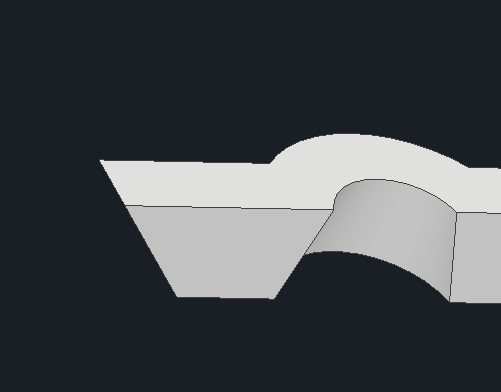
We also added a conical section into both the fixed and moving arms, ensuring a firmer grasp — this proved successful, enabling us to pick up the cone object.

Gear with restrictive plate on top
Figure 3 — Gear with restrictive cap to prevent rack slippage
Conical profile on claw
Figure 4 — Conical profile designed into the claw
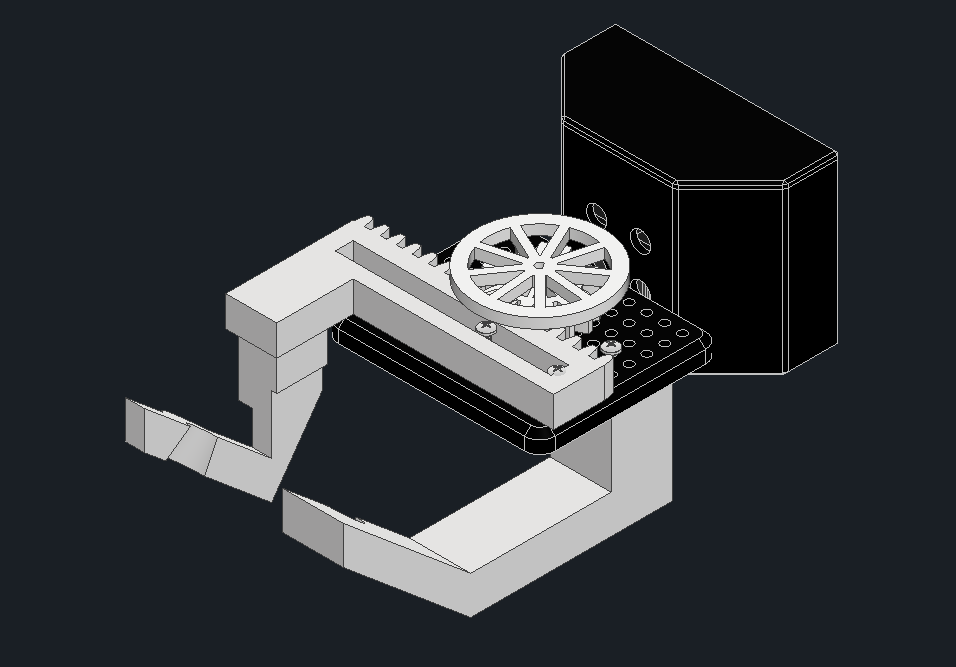
Final CAD design screenshot
Figure 6 — Final CAD design; white = team-designed, black = provided

Prototype Progression

In total we built 4 prototypes. The first two tested rack-and-pinion principles, iterating on degree-of-freedom restrictions. The third was functional but heavy — the small motor lacked enough torque. The fourth was an optimized version with less material.

Optimized Areas

  • Gear cap profile — arcs cut into the top face
  • Thickness of the moving arm assembly

A practice I learned: overbuild parts first, then optimize after you get the product to function.

Design Considerations

The fixed arm was intentionally left slightly overbuilt. During testing, errors in Q-Arm manipulation caused the effector to slam into the table; the overbuilt fixed arm transferred force through the mounting plate rather than breaking. If it did break, reprinting a single arm was far simpler than reprinting the entire rack-and-pinion assembly.

We also split the moving arm into 2 pieces, allowing one piece to be remade independently — this significantly decreased prototype iteration time.

05

Reflection

Many setbacks arose from overcomplicating elements of the task. My initial sketch had 2 moving claws. A teammate pointed out we only needed one, which meant the full torque of the motor could press the object against the fixed claw. Initial testing confirmed the single claw was the right call.

This reinforced the idea that the simplest solution is often the best solution.

CAD Design Python 3D Printing Project Management Rack & Pinion Bcrypt / Encryption

A personal shortcoming as a leader was failing to ensure enough time for testing. We had one 2-hour in-class period, but Q-Arm issues beyond our control left us only ~45 minutes for full integration testing. This led to a failure on demonstration day — which we fixed in under 60 seconds — but a mark deduction nonetheless.

This project underscored the importance of time management and the outsized role it plays in overall project success.

← Back Home Portfolio Next Project → High School Projects